

Search
'분류 전체보기'에 해당되는 글 63건
- 2015.02.12 미니어처
- 2015.01.30 coc (클래시 오브 클랜) 자동파밍,매크로,오토,dummysprite
- 2014.07.09 무료 카운트다운 프로그램 1
- 2014.06.25 (펌글) 대체 소프트웨어를 통한 비용 절감
- 2014.06.18 15GB의 무료클라우드 "copy.com" 소개 및 다운로드 , 인터페이스 미리보기
- 2014.06.16 웹브라우저컨트롤
- 2014.04.30 IIS 6 에서 ASP 에서 대용량 파일을 업로드시 403 오류
- 2014.04.29 비주얼베이직 6.0 컴파일 할때 도움이 되는 링커
- 2014.04.21 쿠키런 사례
- 2014.04.21 안드로이드 File 다루기
coc (클래시 오브 클랜) 자동파밍,매크로,오토,dummysprite 설치법및 사용법
http://www.xiaobaijingling.com

들어가서 안드로이드 누르신후 apk 파일 다운로드후 설치 (루팅필수)

다운받으면 확장자가 apk가 아닌 zip일 수 있으므로 루크익스플로러와 같은 파일관리툴을 이용하여 확장자를 apk로 변경시켜 설치해 주면 끝
가입후 120분간 무료로 실행가능
8달러결제시 300빈 한달 사용
더 결제시 할인 들어감
추천인(invite code) : 54139
*추천인 쓰면 50빈 줌 5일 무료
유투브 링크 : http://www.youtube.com/watch?v=bVhw64EWCT8
사용법 번역
Auto-Danate : 체크시 클랜 지원 요청에 자동으로 지원
Enable request troops : 체크시 자동으로 병력지원을 요청
Enable random donation : 체크시 (기본) 아쳐로 지원
Auto-Search : 체크시 집합소에 병력이 모두 준비되었을때 자동으로 상대 찾기 및 약탈
M-any : 조건중 하나라도 만족시 멈춤
M-all : 조건모두를 만족시 멈춤
Trophy limit : 해당 숫자이하로 트포피를 유지
Auto-Break shield : 체크 해제시 파밍을 위해 보호막을 해제하지 않음
Ba+Ar : 바바+아쳐로 생산
Ba+Ar2 : 바바+아쳐+해골폭탄병
Gi+Bo : 자이언트를 추가
(Gi+Bo옆으로 슬라이드시 나타남)Ba+Hog : 바바+아쳐+호그
Custom : 커스텀조합
<Advanced>
Auto-Collect : 체크시 정제소와 금광에서 자동으로 자원 채취
Lighting spells : 체크시 번개마법을 생산하여 꽉차있는 다크엘릭서 저장소를 발견시 자동으로 사용
Quit farming after empty : 체크시 약탈시 더이상 획득가능한 자원이 없을때 바로 전투를 종료
Reinforcement farming : 체크 해제시 클랜에서 지원받은 병력을 약탈에 사용하지 않고 수비를 위해 남겨놓음
Kings farming : 체크시 바바킹, 아쳐퀸을 파밍에 사용
Kings farming delay(m) : 약탈시 해당숫자만큼의 초 후에 킹, 퀸 투입(5라면 5초후 투입)
Kings skill delay(m) : 해당숫자만큼의 초 후에 킹, 퀸 스킬사용(20이라면 20초후 스킬사용)
<Boost Setting>
Barracks bost: 숫자만큼 배럭가속
Dark barracks boost: 숫자만큼 다크배럭 가속
(Locate dark로 다크배럭위치를 찍어주세요)
Kings boost: 숫자만큼 킹,퀸 가속
B-king: 바바킹
A-king: 아쳐퀸
(locate로 바바킹 아쳐퀸 위치를 찍어주세요 *주의: 회복된후 위치를 찍어주세요)
<Farming>
Reduce condition after : 해당숫자만큼 상대찾기후 검색조건을 완화하여 검색
Send troop delay : 유닛 투입 간격(시간)
Enable intelligent farming : 빈집 위주 공격(100%확실하지 않음)
Skip active hall : 빈집 위주 공격(100%확실하지 않음)
Disable skip wizard tower : 해당 위자드타워가 있을시 다음마을로
(above5 일 경우 약탈할 마을에 6레벨이상 마법사 타워가 있을시 다음마을로 넘어감)
Disable skip bug tower : 해당 인페르노 타워가 있을시 다음마을로
(above1 일 경우 약탈할 마을에 2레벨이상 인페르노 타워가 있을시 다음마을로 넘어감)
Upgrade Wall : 자동으로 벽을 업그레이드(사용가능한 일꾼 필요!)
COC에 필수....
http://free-countdown-timer.com/countdownclock.html
Free Countdown Clock Help
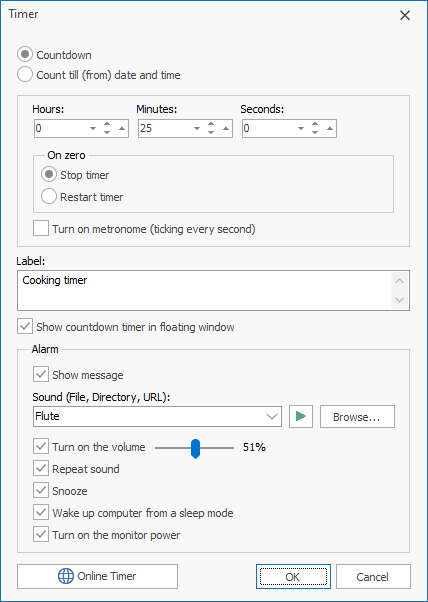
Countdown Timer Settings
- Hours, Minutes, Seconds
- Start value for a countdown timer.
- On zero
- The timer will stop counting down on zero or restart counting. Every time when timer reaches zero it will signal.
- Turn on metronome
- Tick like a timer every second.
- Label
- Label different timers to indicate activities you must do at the sound of the alarm.
- Show countdown timer in floating window
- Display a small separate window with a timer.
- Show message
- If you uncheck this checkbox, a tooltip with the event's description will be displayed in the bottom right corner of the screen.
- You can stop the music by clicking Free Countdown Timer's blinking icon in the system tray. Or, if the timer in floating window is visible, click it to stop the music.
- Concurrent timer events produce only one notification and alarm.
- Sound
- Select the sound you want to use. You can adjust alarm sound by pressing "Browse" button. Free Countdown Timer comes with several sounds and offers full access to your music library.
- The following file formats are supported: mp3, mp2, ogg, wav, wma, aif, aiff, aifc, afc, m3u, flac.
- Turn on the volume
- When the time comes to activate your alarm, the program will set alarm volume to a predefined level.
- The system sound will be turned on, and the specified volume will be set. After the sound is played, the initial volume will be restored.
- Please note that as the system volume will be temporarily changed, it may affect other running applications.
- If you muted the sound or decreased the volume, Free Countdown Timer will unmute the sound and, if necessary, increase the volume to wake you up. If you don't like that, just uncheck the checkbox.
- Repeat sound
- The sound plays repeatedly.
- Snooze
- Activates the "Snooze" feature on your computer.
- Wake up computer from a sleep mode
- While your PC is in sleep mode and the time comes to activate your alarm, Free Countdown Timer will wake up your computer. Verify that Free Countdown Timer is allowed to wake the computer
- Note: Free Countdown Timer will not wake up your computer when the laptop lid is closed.
- Turn on the monitor power
- Allows you to turn your computer's monitor on.
Count till date and time
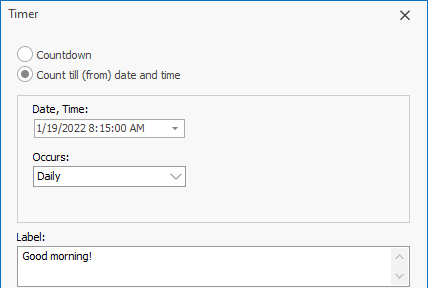
- Date, Time
- Alarm date and time in your Windows native format.
- Repeat
- You can set one-time alarms or repeating alarms. You can use the same settings on consecutive days after you set the initial timer. The countdown timer can continue counting as a stopwatch (increasing).
Unlimited number of timers
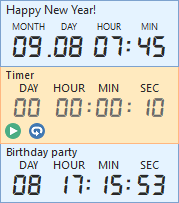
If you need countdown timer software for Windows-based computer, this is the software you are looking for. Free Countdown Timer supports unlimited number of alarms so that you are not restricted to the number of timers you can have.
'컴퓨터 > PC관리용' 카테고리의 다른 글
| WINDOWS 7 UPDATE 오류 해결 (0) | 2015.08.28 |
|---|---|
| 검은 화면 상태로 먹통이 된 원격 데스크톱(Remote Desktop) 문제 해결하기 (0) | 2015.08.07 |
| 윈도 설치 직후 설치할 필수 프로그램 (0) | 2014.02.11 |
| Windows Dos 시스템 및 네트워크 명령어 (0) | 2014.02.11 |
| 클라우드서비스 Copy.com 15GB+5GB의 저장공간 무료 (0) | 2013.10.28 |
원글을 잊지 않기 위해 복사함
ITKim's IT Story

몇 년 전 이전 글에서 언급했던 저작권사로부터 압력을 받아 대체 소프트웨어를 검색한 적이 있었다. 그 중 Office 소프트웨어로는 Star Office가 가장 유력했는데, 기능 및 사용자 편의성 측면에서 너무 부족한 부분이 많아 현업에 사용을 권하기엔 무리가 많았었다. 나 역시나 업무용으로 사용할 수 는 없겠구나 생각을 했는데, 최근 Open Office 4.0을 사용해 본 결과 “이 정도면 충분하다.” 라는 결론을 내렸다.
MS Office 2013문서가 문제 없이 잘 열렸으며, 표 작업이 불편했던 것을 제외하면 사용자 편의성도 무리가 없었다.
사람에 따라 틀리겠지만 MS제품 사용하다가 아래아한글 사용할 때 느끼는 불편함 정도라고 봐도 무방할 정도로 현업에서 큰 저항 없이 받아 들일 것이라고 생각했으며, 당사의 경우 업무 용도에 따라 Open Office만을 배포하여 사용하게 하고 있다.
내가 근무하고 있는 회사의 예가 나왔으니 추가로 몇 가지 더 이야기하자면, Open Office로 대체하는데 첫 번째 걸림돌은 Outlook였다.
그룹웨어의 웹 메일을 사용하고 있었지만, 사용자들은 메일 데이터의 백업을 원했고, 그 백업을 Outlook로 했다. (하지만 실제로는 백업이 아닌 메일 Client로서 사용자가 3분의 2이상 이었다.)
그런 상황에서 email Client를 대체할 소프트웨어가 없거나 Outlook 데이터를 Migration 할 때 문제가 생기면 심각한 상황이었는데, Thundbird라는 email Client를 찾았다. 모질라 재단에서 만든 프로그램으로 Outlook 2013 데이터(pst)도 어려운 작업 없이 가져올 수 있었다.
그럼 본론으로 들어가서 상용소프트웨어에 필적할 만하거나 어떤 경우에는 더 뛰어난 소프트웨어들이 어떤 것이 있는지 살펴보자
선정 기준으로는 국산을 제외했다. 한국 개발자에게는 미안한 일이지만 국산 소프트웨어의 경우 악용사례가 발생했기 때문에 조심스러울 수 밖에 없으니 이해 바란다.
추가하자면 이 글 다음에 언급하는 효율적인 소프트웨어 관리 부분에서 관리 소프트웨어를 언급하려 하는데, 그것도 한국개발자(내가 만들고 있음)가 만들고 있고 물론 Freeware이다.

제품 소개
1. 무료 15기가를 줌
2. 최대 파일 업로드 사이즈 제한이 없음
3. PC싱크 방식의 클라우드로 드라이브 위치 이동이 가능 함
4. 대역폭 및 프락시 설정을 지원
5. 싱크 기능은 안정적인 편이지만 삭제된 파일에 대한 휴지통 날리기 기능이 미비 함
6. 사용자가 점점 많이 늘어나고 있는 클라우드 서비스 중 하나 임
스마트폰 사진백업을 위해 사용하면 좋음
15GB무료 제공 PC용 어플리케이션 설치 시 5GB 추가
(친구 초대하여 가입 시 5G추가)
이름/이메일/비밀번호 만으로 회원가입이 가능

설치과정 및 간단한 인터페이스 보


원본 : http://www.vbforums.com/showthread.php?384076-Webbrowser-Control-Tip-and-Examples
Navigating to a site:
사이트 찾기...
visual basic code: WebBrowser1.Navigate "www.google.com"
팝업창을 윈도우 폼으로 열기
사이트에서 새로운 팝업창이 열리게 될때 정한 폼을 대상으로 새 창이 열리게 된다.
visual basic code: Private Sub WebBrowser1_NewWindow2(ppDisp As Object, Cancel As Boolean) Dim frm As Form1 Set frm = New Form1 Set ppDisp = frm.WebBrowser1.Object frm.Show End Sub
단어/문장을 페이지에서 찾아냄
단어나 문장을 찾아냄.
visual basic code: Private Sub Command1_Click() Dim strfindword As String strfindword = InputBox("What are you looking for?", "Find", "") ' what word to find? If WebPageContains(strfindword) = True Then 'check if the word is in page MsgBox "The webpage contains the text" 'string is in page Else MsgBox "The webpage doesn't contains the text" 'string is not in page End If End Sub Private Function WebPageContains(ByVal s As String) As Boolean Dim i As Long, EHTML For i = 1 To WebBrowser1.Document.All.length Set EHTML = _ WebBrowser1.Document.All.Item(i) If Not (EHTML Is Nothing) Then If InStr(1, EHTML.innerHTML, _ s, vbTextCompare) > 0 Then WebPageContains = True Exit Function End If End If Next i End Function Private Sub Form_Load() WebBrowser1.Navigate2 "www.msn.com" End Sub
시작 페이지 만들기
이코드는 이벤트에서 어떻게 만들어지고 보여지나.
visual basic code: Private Sub Form_Load() WebBrowser1.Navigate "about:blank" End Sub Private Sub Command1_Click() Dim HTML As String '----------The HTML CODE GOES FROM HERE AND DOWN---------- HTML = "<HTML>" & _ "<TITLE>Page On Load</TITLE>" & _ "<BODY>" & _ "<FONT COLOR = BLUE>" & _ "This is a " & _ "<FONT SIZE = 5>" & _ "<B>" & _ "programmatically " & _ "</B>" & _ "</FONT SIZE>" & _ "made page" & _ "</FONT>" & _ "</BODY>" & _ "</HTML>" '----------The HTML CODE GOES HERE AND ABOVE---------- WebBrowser1.document.write HTML End Sub
보통 브라우저 함수
간단한 브라우저의 함수.
visual basic code: Private Sub Command1_Click(Index As Integer) On Error Resume Next ' just in case there is no page back or forward 'I showed how to disabel them if you scroll down more Select Case Index Case 0 'Go Back Button WebBrowser1.GoBack 'Go Back one Page Case 1 'Go Forward Button WebBrowser1.GoForward 'Go Forward one Page Case 2 'Stop Button WebBrowser1.Stop 'stop page Case 3 'Refresh Button WebBrowser1.Refresh 'refresh page Case 4 'Go Home Button WebBrowser1.GoHome 'Go to home page Case 5 'Search Button WebBrowser1.GoSearch 'Search End Select End Sub
고급 브라우저 함수
이것들은 복잡한 브라우저의 함수 프린트나 페이지 속성.
visual basic code: Private Sub Command1_Click() 'Print Button WebBrowser1.ExecWB OLECMDID_PRINT, OLECMDEXECOPT_DODEFAULT 'Show Print Window End Sub Private Sub Command2_Click() 'Print Preview Button WebBrowser1.ExecWB OLECMDID_PRINTPREVIEW, OLECMDEXECOPT_DODEFAULT 'Show Print Preview Window End Sub Private Sub Command3_Click() 'Page Setup Button WebBrowser1.ExecWB OLECMDID_PAGESETUP, OLECMDEXECOPT_DODEFAULT 'Show Page Setup Window End Sub Private Sub Command4_Click() 'Page Properties Button WebBrowser1.ExecWB OLECMDID_PROPERTIES, OLECMDEXECOPT_DODEFAULT 'Show Page Properties Window End Sub Private Sub Form_Load() WebBrowser1.Navigate "www.google.com" End Sub
웹의 글꼴 사이즈 변경
페이지의 글꼴크기를 어떻게 변경 하느냐, internet explorer 보기-> 텍스트크기 메뉴
visual basic code: Private Sub Command1_Click() ' Smallest Button On Error Resume Next WebBrowser1.ExecWB OLECMDID_ZOOM, OLECMDEXECOPT_DONTPROMPTUSER, CLng(0), vbNull End Sub Private Sub Command2_Click() 'Small Button On Error Resume Next WebBrowser1.ExecWB OLECMDID_ZOOM, OLECMDEXECOPT_DONTPROMPTUSER, CLng(1), vbNull End Sub Private Sub Command3_Click() 'Medium Button On Error Resume Next WebBrowser1.ExecWB OLECMDID_ZOOM, OLECMDEXECOPT_DONTPROMPTUSER, CLng(2), vbNull End Sub Private Sub Command4_Click() 'Large Button On Error Resume Next WebBrowser1.ExecWB OLECMDID_ZOOM, OLECMDEXECOPT_DONTPROMPTUSER, CLng(3), vbNull End Sub Private Sub Command5_Click() 'Largest Button On Error Resume Next WebBrowser1.ExecWB OLECMDID_ZOOM, OLECMDEXECOPT_DONTPROMPTUSER, CLng(4), vbNull End Sub Private Sub Form_Load() WebBrowser1.Navigate2 "www.google.com" End Sub
페이지 목록의 함수 (뒤로/앞으로)
버튼의 사용/사용안함과 열어본 페이지중 뒤/앞 페이지를 열 수 있다.
visual basic code: Private Sub Command1_Click() 'Go Back Button WebBrowser1.GoBack 'Go Back End Sub Private Sub Command2_Click() 'Go Forward Button WebBrowser1.GoForward 'Go Forward End Sub Private Sub Form_Load() WebBrowser1.Navigate "www.google.com" End Sub Private Sub WebBrowser1_CommandStateChange(ByVal Command As Long, ByVal Enable As Boolean) Select Case Command Case 1 'Forward Command2.Enabled = Enable Case 2 'Back Command1.Enabled = Enable End Select End Sub
인쇠 관련 함수 (페이지 설정/프린트 미리보기/프린터 설정)
이함수는 어떻게 페이지 설정,미리보기,프린터 설정을 하는가를 보여준다.
visual basic code: Private Sub Command1_Click() 'Print Button WebBrowser1.ExecWB OLECMDID_PRINT, OLECMDEXECOPT_DODEFAULT 'Show Print Window End Sub Private Sub Command2_Click() 'Print Preview Button WebBrowser1.ExecWB OLECMDID_PRINTPREVIEW, OLECMDEXECOPT_DODEFAULT 'Show Print Preview Window End Sub Private Sub Command3_Click() 'Page Setup Button WebBrowser1.ExecWB OLECMDID_PAGESETUP, OLECMDEXECOPT_DODEFAULT 'Show Page Setup Window End Sub Private Sub Form_Load() WebBrowser1.Navigate "www.google.com" End Sub Public Function Enable_or_Disable() If WebBrowser1.QueryStatusWB(OLECMDID_PRINT) = 0 Then Command1.Enabled = False Else Command1.Enabled = True End If If WebBrowser1.QueryStatusWB(OLECMDID_PRINTPREVIEW) = 0 Then Command2.Enabled = False Else Command2.Enabled = True End If If WebBrowser1.QueryStatusWB(OLECMDID_PAGESETUP) = 0 Then Command3.Enabled = False Else Command3.Enabled = True End If End Function Private Sub WebBrowser1_BeforeNavigate2 _ (ByVal pDisp As Object, _ URL As Variant, _ Flags As Variant, _ TargetFrameName As Variant, _ PostData As Variant, _ Headers As Variant, _ Cancel As Boolean) Enable_or_Disable End Sub Private Sub WebBrowser1_DocumentComplete(ByVal pDisp As Object, URL As Variant) Enable_or_Disable End Sub
Removing Right Click Menu From the browser control
So you need to remove the right click menu from the control, right? well there are more then two ways one of them, which i knew but i won't bother telling is using lots of hooking, waist of thime since all you have to do is download a simple helper file.
First you need to go to http://support.microsoft.com/kb/q183235/ and download the WBCustomizer.dll. once done go to the"Project Menu" and click on "Refrences" Click on browse and add the 'WBCustomizer.dll' to you app. once done just add this simple code.
visual basic code: Option Explicit Dim CustomWB As WBCustomizer 'Deceler the CustomWB Private Sub Form_Load() Set CustomWB = New WBCustomizer With CustomWB .EnableContextMenus = False 'Disable The Menu .EnableAllAccelerators = True Set .WebBrowser = WebBrowser1 End With WebBrowser1.Navigate "www.google.com" CustomWB.EnableContextMenus = False End Sub
Grab all links on the page
This code shows how to grab and list all the links on a page, this can be used a spider software for a search engine site.
In order to get this code to load you must add the "Microsoft HTML Object Library" into your app refrences.
visual basic code: Option Explicit Private Sub Form_Load() WebBrowser1.Navigate "www.vbforums.com" End Sub Private Sub WebBrowser1_DownloadComplete() 'you must add the "Microsoft HTML Object Library"!!!!!!!!! Dim HTMLdoc As HTMLDocument Dim HTMLlinks As HTMLAnchorElement Dim STRtxt As String ' List the links. On Error Resume Next Set HTMLdoc = WebBrowser1.Document For Each HTMLlinks In HTMLdoc.links STRtxt = STRtxt & HTMLlinks.href & vbCrLf Next HTMLlinks Text1.Text = STRtxt End Sub
You can add this code in order to log this files.
visual basic code: Open "C:\Documents and Settings\[YOU USERNAME]\Desktop\link log.txt" For Append As #1 Print #1, STRtxt Close #1
Save Page
This code shows you how to save the browser's page.
visual basic code: Option Explicit Private Sub Command1_Click() WebBrowser1.ExecWB OLECMDID_SAVEAS, OLECMDEXECOPT_DODEFAULT End Sub Private Sub Form_Load() WebBrowser1.Navigate2 "www.google.com" End Sub
Open Page
Here is how to load a webpage into the webbrowser.
visual basic code: Private Sub Command2_Click() WebBrowser1.ExecWB OLECMDID_OPEN, OLECMDEXECOPT_PROMPTUSER End Sub
This is how to open a page, using the comman dialog's way
visual basic code: Option Explicit Private Sub Command1_Click() On Error Resume Next With CommonDialog1 .DialogTitle = "Open File" .Filter = "Web page (*.htm;*.html) | *.htm;*.html|" & _ "All Supported Picture formats|*.gif;*.tif;*.pcd;*.jpg;*.wmf;" & _ "*.tga;*.jpeg;*.ras;*.png;*.eps;*.bmp;*.pcx|" & _ "Text formats (*.txt;*.doc)|*.txt;*.doc|" & _ "All files (*.*)|*.*|" .ShowOpen .Flags = 5 WebBrowser1.Navigate2 .FileName End With End Sub Private Sub Form_Load() WebBrowser1.Navigate2 "www.google.com" End Sub
Auto Submit
This Simple Code I Made To show you how to make a submittion form. This code will autofill the need filled and submit it.
visual basic code: Private Sub Command1_Click() Dim strwebsite As String Dim stremail As String strwebsite = "http://www.mysite.com" stremail = "myemail@host.com" WebBrowser1.Document.addurl.URL.Value = strwebsite WebBrowser1.Document.addurl.Email.Value = stremail WebBrowser1.Document.addurl.Submit End Sub Private Sub Form_Load() WebBrowser1.Navigate "http://www.scrubtheweb.com/addurl.html" End Sub
Using A ProgressBar With The Webbrowser
This is to show how to use a progressbar with a webbrowser control.
visual basic code: Private Sub Form_Load() WebBrowser1.Navigate "www.msn.com" ProgressBar1.Appearance = ccFlat ProgressBar1.Scrolling = ccScrollingSmooth End Sub Private Sub WebBrowser1_ProgressChange(ByVal Progress As Long, ByVal ProgressMax As Long) On Error Resume Next If Progress = -1 Then ProgressBar1.Value = 100 Me.Caption = "100%" If Progress > 0 And ProgressMax > 0 Then ProgressBar1.Value = Progress * 100 / ProgressMax Me.Caption = Int(Progress * 100 / ProgressMax) & "%" End If Exit Sub End Sub
Setting a Control in a Webbrowser to focus
This shows how to set a control inside the webbrowser into focus.
visual basic code: Private Sub Command1_Click() WebBrowser1.Document.All("q").focus 'Set the search text filed in focus End Sub Private Sub Command2_Click() WebBrowser1.Document.All("btnI").focus 'Set the google "I Am feeling lucky in focus button" End Sub Private Sub Form_Load() WebBrowser1.Navigate "http://www.google.com/" End Sub
Or you can use:
visual basic code: WebBrowser1.Document.getElementById("Object's Name").Focus
Checkbox in a page, how to control it
This is an example on how to check or uncheck the remember me checkbox on the google login page:
visual basic code: Private Sub Form_Load() WebBrowser1.Navigate "https://www.google.com/accounts/ManageAccount" End Sub Private Sub Check1_Click() If Check1.Value = 0 Then WebBrowser1.Document.All.PersistentCookie.Checked = False 'unchecked Else WebBrowser1.Document.All.PersistentCookie.Checked = True 'checked End If End Sub
Or
visual basic code: Private Sub Form_Load() WebBrowser1.Navigate "https://www.google.com/accounts/ManageAccount" End Sub Private Sub Check1_Click() If Check1.Value = 0 Then WebBrowser1.Document.All.PersistentCookie.Checked = 0 'unchecked Else WebBrowser1.Document.All.PersistentCookie.Checked = 1 'checked End If End Sub
Or
visual basic code: Private Sub Form_Load() WebBrowser1.Navigate "https://www.google.com/accounts/ManageAccount" End Sub Private Sub Check1_Click() If Check1.Value = 0 Then WebBrowser1.Document.getElementById("PersistentCookie").Checked = False 'unchecked Else WebBrowser1.Document.getElementById("PersistentCookie").Checked = True 'checked End If End Sub
Custom Right Click Menu
This is an example show how to make your own custom right click menu. in order for this to work you must add the "Must Add Microsoft HTML Object Library" to your refrance.Also make your own custom menu using the menu editor I named my "mnu"
Please Note it will effect all the context menus in the webbrowser.
visual basic code: 'Must Add Microsoft HTML Object Library Option Explicit Public WithEvents HTML As HTMLDocument Private Function HTML_oncontextmenu() As Boolean HTML_oncontextmenu = False PopupMenu mnu '<---Check the mnu to your own menu name End Function Private Sub Form_Load() WebBrowser1.Navigate "www.google.com" End Sub Private Sub Form_Unload(Cancel As Integer) Set HTML = Nothing End Sub Private Sub WebBrowser1_DocumentComplete(ByVal pDisp As Object, _ URL As Variant) Set HTML = WebBrowser1.Document End Sub
Copy the contents of the WebBrowser control to the Clipboard
To programmatically copy text from the WebBrowser control you can use its ExecWB method, to which you must pass the OLECMDID_COPY constant as its first argument.
WebBrowser1.ExecWB OLECMDID_COPY, OLECMDEXECOPT_DODEFAULT
' select the entire document
WebBrowser1.ExecWB OLECMDID_SELECTALL, OLECMDEXECOPT_DODEFAULT
' copy the text to Clipboard
WebBrowser1.ExecWB OLECMDID_COPY, OLECMDEXECOPT_DODEFAULT
' clear the selection
WebBrowser1.ExecWB OLECMDID_CLEARSELECTION, OLECMDEXECOPT_DONTPROMPTUSER
'응용프로그램 > Visual Basic' 카테고리의 다른 글
| 비주얼베이직 6.0 컴파일 할때 도움이 되는 링커 (0) | 2014.04.29 |
|---|
요청 개체 오류 'ASP 0104 : 80004005'
허용되지 않는 작업
/stock/RegStock.asp, 줄 2
이런 오류가 발생할때~~~~?????
========================================================
파일 형식때문에 오류가 나는게 아니구
파일 크기 때문에 오류가 나는거예요..^^
Server의 운영체제가 windows 2003 이시죠?
서비스에서 IIS Admin Service 를 중단하고 C:\winnt\system32\inetsrv 의
metabase.xml을 수정하세요...
주의할 점 : 꼭 IIS를 중단하고 수정할 것.
그렇지 않으면 AspMaxRequestEntityAllowed 이 값이 사라져서 한참을 고생하게 됩니다...
AspMaxRequestEntityAllowed
이부분을 204800 = 200kb (200 kb로 제한되어 있습니다.)
204800 * 5 (10MB가 되겠죠)
고친후 iis를 다시 시작하시면 됩니다...
[출처 : 네이버 지식인]
========================================================================
IIS 6 에서 ASP 에서 대용량 파일을 업로드시 403 오류 - KB327659
ASP(Active Server Pages) 요청을 사용하여 Microsoft 인터넷 정보 서비스(IIS) 5.0, Microsoft 인터넷 정보 서비스(IIS) 5.1 또는 Microsoft 인터넷 정보 서비스(IIS) 6.0이 설치된 컴퓨터에 큰 파일을 업로드하면 업로드가 실패할 수 있습니다. 또한 403 오류 응답이나 다음 중 하나와 유사한 오류 메시지가 나타날 수 있습니다.
오류 메시지 1
Request object error 'ASP 0104 : 80004005' 허용되지 않는 작업 :
오류 메시지 2
007~ASP 0104~허용되지 않는 작업
많은 폼 데이터를 ASP 페이지에 게시할 때 다음과 유사한 오류 메시지가 나타날 수 있습니다.
오류 ’80020009’ 예외가 발생했습니다.
또한 Response.binaryWrite 메서드를 사용할 때 파일 업로드가 실패할 수 있습니다.
이 문제는 Content-Length 헤더가 있고 Content-Length 헤더에서 IIS 메타베이스의 AspMaxRequestEntityAllowed 속성 값보다 큰 데이터 양을 지정하는 경우 발생합니다. AspMaxRequestEntityAllowed 속성의 기본값은 204,800바이트입니다.
해결 방법
cscript adsutil.vbs set w3svc/ASPMaxRequestEntityAllowed size
(*이 명령에서 size는 허용할 최대 파일 크기 업로드의 자리 표시자입니다. 최대값은 1,073,741,824바이트입니다. 이 값을 원하는 기능에 허용되는 최소값으로 설정하십시오.)
--> 업로드 컴포넌트의 성능에 따라서, 대용량 파일을 업로드 하면 웹서버측 메모리 과다 점유로 인해서 성능저하가 발생할 수 있으니 조심 스럽게 설정하는게 좋습니다.^^
이와 관련된 메타베이스 값으로 AspBufferingLimit 있습니다. 이 부분은 다운로드 버퍼링에 관련된 것으로 파일 링크를 막기 위해서 Asp 코드에 파일 쓰기후 다운로드 처리를 하는 경우가 많은데요,. 이때 대용량 파일 다운로드시에 지정된 크기 이상일 경우 오류가 발생하게 됩니다.
AspBufferingLimit : http://msdn.microsoft.com/library/default.asp?url=/library/
en-us/iissdk/html/ecfc3d4a-0178-45e8-89f8-304429b7fda5.asp
AspMaxRequestEntityAllowed 속성은 ASP 요청의 엔터티 본문에서 허용되는 최대 바이트 수를 지정합니다. Content-Length 헤더가 있고 Content-Length 헤더에서 AspMaxRequestEntityAllowed 속성 값보다 큰 데이터 양을 지정하는 경우 IIS에서 403 오류 응답을 반환합니다. AspMaxRequestEntityAllowed 속성은 PUT 요청과 POST 요청에만 적용되고, GET 요청에는 적용되지 않습니다. 이 메타베이스 속성이 ASP에만 적용되기 때문에 다른 ISAPI(인터넷 서버 API) 확장은 영향을 받지 않습니다.
AspMaxRequestEntityAllowed 속성은 MaxRequestEntityAllowed 속성의 기능과 관련되어 있습니다. 그러나 AspMaxRequestEntityAllowed 속성은 ASP 요청에만 적용됩니다. MaxRequestEntityAllowed 속성을 WWW 서비스(World Wide Web 게시 서비스) 수준에서 1MB로 설정할 수 있습니다. 그런 다음 특정 ASP 응용 프로그램에서 더 작은 양의 데이터를 처리하는 것을 알고 있는 경우 AspMaxRequestEntityAllowed 속성을 더 작은 값으로 설정할 수 있습니다.
--> ASP.NET 에서는 machine.config 또는 전역 web.config 및 각 웹사이트의 web.config 에서 지정할 수 있습니다.^^
스크랩원본글: http://www.serverinfo.pe.kr/TipnTech.aspx?Category=&Mode=View&KeyName=&KeyWord=&Page=&Seq=289
[출처웹사이트: 서버주무르기[Serverinfo.pe.kr]
[출처] IIS 6 에서 ASP 에서 대용량 파일을 업로드시 403 오류 |작성자 실버
'웹 > ASP' 카테고리의 다른 글
| IIS6 다운로드/업로드 크기제한 (0) | 2015.09.20 |
|---|---|
| ASP에서 UTF-8 처리 외 기타 (0) | 2014.04.08 |
| ASP DateAdd함수 (0) | 2014.03.04 |
비주얼베이직 6.0 컴파일 할때 도움이 되는 링커
비쥬얼베이직 6.0 에서 exe를 만들려면 컴파일을 해야합니다.
그때 자체 컴파일을 하는것보다 이 링커를 쓰시면
오류도 해결할수도있고 (vb6ko.dll) 을 필요없게 한다던지 여러가지 좋은점이 있습니다.
 VB서비스링커.exe
※ VB Linker Helper의 특징:
- VB6KO.DLL 요구하지 않게 패치 가능.
- 일반 DLL 제작 가능.
- 콘솔 응용 프로그램 제작 가능.
- UPX/FSG 패커 내장 및 UPX 언팩 방지 기능.
- 일반 링커가 수행하는 왠만한 기능 가능 (ImageBase 변경, MAP 파일 생성 등)
- 링커 설정을 저장할 수 있음.
- 비스타 이상의 PC에서 관리자 권한을 요구할 수 있음. (※ 기본 사항이 아니므로, 이 기능은 기본적으로 선택 해제되어 있음.)
- 그 외 다수.
※ 설치 방법:
첨부된 Setup.exe(알집 SFX) 파일을 실행 후 압축을 푸시면 됩니다.
파일 경로는 c:\ - program files - Microsoft Visual Studio - VB98 << 기본 설치 경로
다른곳에설치하였다면 자기가 비쥬얼베이직을 설치한 경로에 압축을 풀어주세요
다른곳에설치하였다면 자기가 비쥬얼베이직을 설치한 경로에 압축을 풀어주세요
비주얼베이직 경로에 Link.exe를 넣고, 기존에 있던 Link.exe의 이름을 LiNKWIN.EXE로 변경해주세요.
그럼 정상적으로 작동될 것입니다.
[TIP]
EXE가 만들어 지지 않는다면?
- 포터블 버젼이다.
- 컴파일을 시도해보시고 exe를 만들어 보세요.
- 프로젝트 저장하기 해서 비베를 끈후 다시 그 프로젝트를 실행해 시도해보세요.
'응용프로그램 > Visual Basic' 카테고리의 다른 글
| 웹브라우저컨트롤 (0) | 2014.06.16 |
|---|
쿠키런 사례
KGC2013 을 참가 했었는데
이틀째 세션에는 아마존을 활용한 쿠키런 사례? 비슷한게 있었는데 개발쪽 세션입니다.
결론 부터 말하자면 대략적으로 AWS에서 자동화를 통해서 쿠키런을 운영할 수 있었다.
혼자서 서버 개발과 운영을 해야 했고 할 수 있었다.
발표 내용
서버 개발자 자기 포함2명인데 한명은 나가기로 예정되어있어서
결국적으로는 1명. 개발 / 운영을 해야되었다.
어디를 선택할지에 대해서 지인들에게 문의를 많이했었고 이런 결과를 얻게되었다.
- 서버 IDC 입주를 고려 했었는데 선은 어디 쓰지 IDC가서 설치는 누가 하지 영세한 게임 회사로써는 여러가지 문제들이 꽃피움 그래서 IDC제외
- 한국 클라우드 서비스를 하는 벤더들의 대한 신뢰 없음
- ELB가 뻗는 경우가 있었다라는 말을 함.
- 하청을 주는데 하청이 거지 같더라
- 그래서 한국 벤더 제외
여기서 부터 AWS에 극찬이 시작됨 못하는게 없다라는 식인데 오오 하며 흥미를 갖고 보게됨
AWS
- 다양한 서비스 제공
- 모든 서비스는 API로 제어가 가능 (API를 제공하는 언어도 많음)
- auto scaling, ELB, S3 등이 매력적이였다.
자동화 하기 위해서 사용한 방법
- CloudFormation : 예를 들면 디비를 만들고 웹서버 5대를 붙여 라는걸 자동으로 해주게 끔 만들고
- Chef : 아파치 한대를 열고 쿠키런 웹서버를 띄우고 방화벽 설정을 뭘로 잡고 이런걸 json 이나 소스코드로 인프라를 관리
- 위에 두개를 git 을 통해서 관리
- git 을 통해서 관리하니 서버의 변화라던지 설정의 형상 관리를 할 수있었다.
꼭 사용 하라고 하는것
- ELB, Auto Scaling 을 꼭 사용해라 그리고 CloudFormation 을 통해서 구현
- S3를 사용해서 게임 데이터를 제공하자 -> Ex: 신규 텍스쳐 사운드를 다운받도록 할 수 있다.
- 모니터링은 확실하게 하자 -> 모니터링 툴을 통해서 하도록 하자
쿠키런 출시 초기
- 첫날 9만 가입
- 6일 120만 가입
- 기하급수적으로 증가 auto scaling 100대가 넘는 상황
- 잘되던 환경에서 온갖 문제들이 터지기 시작함.
- 푸쉬를 보낼때마다 GCM push 서버가 5초간 응답이 없다고 했나 뭐 어쨋든
- 마스터 인스턴스가 죽기도하고 슬레이브가 깨지기도 하고 트렌젝션 관리라던지
- 기타 등등
장애의 회고
- AWS의 직접적인 문제는 없었다.
- AWS Bisiness Support 에 가입하라
- 돈은 비싸지만 장애시 유일한 동반자가 되었다.
- Engineer 에 따라서 AWS 외적인 문제도 도와주었다. (단 영어로)
- 장애를 신속하게 파악 판단 및 해결 하는데 필수적이다.
장애의 핵심적인 원인
- 순수한 데이터베이스 부하
- 게임 시작 및 게임 플레이 정산 부하로 데이터베이스 쓰기 폭주
- Checkpoint Age 문제로 throughput 급락 이후 장애
- 생명 보내기 기능 ( 기획의 일부)
- 매 시간 마다 N명의 사용자가 M 명의 사용자에게 생명을 “받고 보내기”
- 최대 3* 24*N* M 의 데이터로 DB 엔트리 급격하게 증가
- MySQL Delete 문의 테이블 락으로 성능저하
- 데이터를 삭제 하지 않으나 데이터가 무한정 쌓임
장애 해결을 위한 기초시도
- 이미 JOIN 이나 데이터 종속이 심하다
- 급하게 NoSQL 솔루션을 알아보기 시작
- Riak : 사용자 경험이 있지만 throughput이 낮음
- Couchbase : 성능은 좋아 보이나 왠지 사용버전을 써야 할것 같다.
- Redis : 사용하기 쉽고 관리하기 쉽고 throughput도 높다.
- 선물 포인트 생명 갯수 등은 redis 으로 마이그레이션
- 급하게 NoSQL 솔루션을 알아보기 시작
노하우의 느낌
- EC2 Auto Scaling 으로 API 서버의 확장 문제 해결
- 출시전 AWS Instance Limit 을 미리 올려 놓을 것 (기본 20대) 무조건 해하기를 권한다
- 개별 인스턴스의 CPU사용율을 60% 이하로 유지해야 안정적
- 평균 CPU 사용량 2분동안 60% 이상 -> 인스턴스 2대 증가
- 최대 CPU 사용량을 2분동안 80%이상 -> 인스턴스 2대 증가
- 미리 AMI 를 빌드하여 인스턴스 부팅부터 서비스 시작 시간을 1분 이하로 줄여 놓을것
- m1.medium, m1.large, m1.xlarge, c1.xlarge 순으로 인스턴스 변경
- 인스턴스는 최대 200대로 이하로 유지할 것 (이 이상은 관리를 하는데 있어서 비효율적이였다)
- 실시간 로그 검색 / 분석 ElasticSearch
- 대용량 푸쉬 python, Celery
- CouchBase – 생명 우편함 등의 대용량 소셜 정보
- Redis 의 메모리 한계로 인해서 CouchBase 로 점차 변경중
- 유지 보수를 하지말아야하고 최대한 자동화를 통해서 아마존을 활용해야 한다.
- AMI, ELB, EBS 등의 조합으로 확장성 있는 고가용 서버 구축 가능
- S3, CloudFront -> 정적인 파일 저장 및 제공은 S3와 CloudFront (CDN)으로 모두 해결 가능
아마존 기능 설명
AWS RDS
- Replication,Backup 등을 알아서 관리해주는 편리한 서비스
- 데이터 베이스 Scale-up 가능
- 온라인 상태에서 IOPS증가 가능
- 사양 변경은 꼭 테스트 후에 , 가능하면 새벽 시간에 할 것
- 장애에 대비하여 Muiti-AZ 옵션 필수적
- MySql 5.5 의 경우 Master Failover 시 Slave Replica 가 깨지는 경우 발생
- RDS MySQL 5.6 에서 해결
Redis
- 설치하기 쉽고 쓰기 간편, 쓰기 성능도 매우훌륭
- 데이터 구조를 많이 지원 LeaderBoard 등 개발시 매우 편리
- 메모리를 넘어서는 데이터에 대해서는 답이 없음
- 최근 ElastiCache로 redis 를 지원하기 시작
AWS 와 IDC의 가격 비교
- 단순 서버 vs EC2 비교의 경우 Reserved Instance 를 꼭 고려해야 3년정도 예약하면 반값정도 할인해준다
- 로드벨런서 ,방화벽, 운영체제 설치 및 설정을 하려면 IDC에 가서 삽질 시작해야되지만 AWS은 필요없다. 마우스로 해결할 수 있다.
- 고가용성 정적 파일 호스팅을 구현하는 비용 CDN 은 누구랑 계약 해야 하나. 기타등등
- DB관리 Replication, Backup, Monitoring 는 누가? 누가하지?…를 고려해야 된다.
- 필요시 바로바로 서버를 이용 할 수 있다. vs IDC는 2주 이상 기다려서 서버를 넣어야된다.
- Capex Vs Opex : 운영비용과 자산비용의 차이
- 혼자 서버를 관리 한다면 어떤것을 선택할 것인가?
비용의 진실
- 전통적인 관점으로 바라보면 저렴하지 않은 AWS이다.
- 그러나 AWS에서제공하는 다양한 서비스를 활요한다면 훨씬 절약
- 트레픽 증감에 따라서 EC2가 Auto Scale ; 정확히 사용한 것만 지불하여 비용절감
- 1대에서 200대 까지 Scale out 을 해야 한다면 ? AWS를 사용해서는 200대 까지는 한번도 문제가 없었다.
- EC2 Reserved Instance 요금제로 비용을 최적화 -> 예약을 하면 비용을 줄일 수 있다.
- 급격하게 변하는 모바일 게임 시장, AWS는 필연적 선택
- 저렴하고 확장성있는 서버보다 성공하는 게임을 만드는게 훨씬 어렵다.
- 재미있는 게임을 만들 수 있도록 기능 개발 자체에 투자를 해야. -> 설정 복잡하게 하는 시간에 재미있는 게임 만들도록 하자
사용자가 늘어남에 따라서 지속적인 마이그레이션을 통하였고
mysql -> redis -> couchbase 로 변화중
이상이 발표를 적은 내용 … 입니다.
안드로이드 File 다루기
File 다루기
- 안드로이드는에는 내부, 외부의 두가지의 파일 저장 영역이 있다. (internal, external storage)
internal storage (내부)
- 항상 사용가능하며 내부에 저장된 파일은 기본적으로 해당 앱만 접근 가능하다.
- 시스템은 앱이 제거될때 내부에 저장된 파일을 모두 제거한다.
external storage (외부)
- 이곳에 저장된 파일은 다른 곳에서 읽혀질 수 있다. 따라서 다른 앱과 공유될 수 있거나 컴퓨터로 따로 관리할 파일들을 저장하는데 사용하는 것이 좋다.
참고
앱은 기본적으로 internal storage 에 저장되지만 manifest 파일내의 android:installLocation 속성으로 external storage 에 저장할 수 있다.
예) apk 파일의 사이즈가 매우 큰경우
external storage 권한 얻기
쓰기 권한
<manifest ...>
<uses-permission android:name="android.permission.WRITE_EXTERNAL_STORAGE"/>
</manifest>
읽기 권한
차후에는 external storage 에 대한 읽기 권한은 기본으로 제공될 예정
<manifest ...>
<uses-permission android:name="android.permission.READ_EXTERNAL_STORAGE"/>
</manifest>
internal storage 에 파일 저장하기
getFileDir()
- 앱 관련된 파일을 저장할 내부 디렉토리의 File 객체를 리턴한다.
getCacheDir()
- 앱의 임시 캐쉬 파일을 저장할 수 있는 디렉토리의 File 객체를 리턴한다.
파일 저장하기
File file = new File(context.getFilesDir(), filename);
String filename = "myfile";
String string = "Hello world";
FileOutputStream outputStream;
try{
outputStream = openFileOutput( filename, Context.MODE_PRIVATE);
outputStream.write( string.getBytes());
outputStream.close();
}catch( Exception e){
e.printStackTrace();
}
임시파일 생성
public File getTempFile( Context context, String url){
File file;
try{
String fileName = Uri.parse(url).getLastPathSegment();
file = File.createTempFile( fileName, null, context.getCacheDir());
}catch( IOException e){
}
return file;
}
external stroage 에 파일 저장하기
외부 저장소가 연결되어 있으며 사용가능한지 여부 체크
public boolean isExternalStorageWritable(){
String state = Environment,getExternalStorageState();
if( Environment.MEDIA_MOUNTED.equals( state)){
return true;
}
return false;
}
public boolean isExternalStorageReadable(){
String state = Environment.getExternalStorageState();
if( Environment.MEDIA_MOUNTED.equals( state) ||
Environment.MEDIA_MOUNTED_READ_ONLY.equals( state)){
return true;
}
return false;
}
external storage 공용 public 저장소 사용하기
public 저장소는 앱을 삭제해도 저장되어 있는 파일이 사용가능하다.
public File getAlbumStorageDir( String albumName){
File file = new File( Environment.getExternalStoragePublicDirectory( Environment.DIRECTORY_PICTURES),
albumName
);
if( !file.mkdir()){
Log.e( LOG_TAG, "Directory not created");
}
return file;
}
external storage 개인 private 저장소 사용하기
앱이 제거되면 private 저장소내의 모든 파일을 삭제한다.
public File getAlbumStorageDir( String albumName){
File file = new File( Environment.getExternalFilesDir( Environment.DIRECTORY_PICTURES),
albumName
);
// root 디렉토리 얻기
// file = new File( Environment.getExternalFilesDir( null));
if( !file.mkdir()){
Log.e( LOG_TAG, "Directory not created");
}
return file;
}
저장공간 확인
getFreeSpace(), getTotalSpace() 로 확인할 수 있다.
파일 삭제하기
myFile.delete();
myContext.deleteFile( fileName);
'모바일 > Android' 카테고리의 다른 글
| LG기기 한방에 루팅! LG One Click Root [G3/G2/Gpro2 루팅하기] (2) | 2015.09.14 |
|---|---|
| TWRP 설치된 기기에서 OTA 업데이트 후 무한 리커버리 모드 복구 (1) | 2015.09.14 |
| GomdoLight 롬 (0) | 2014.03.05 |
| Top 10 이클립스 플러그인 (0) | 2013.10.01 |

2